

Building an API automation testing framework starts with understanding APIs and choosing the right tools for scripting, execution, and integration. Whether you're a beginner or an experienced tester, this guide walks you through each crucial step, right from understanding APIs and selecting the right tools to setting up your environment, writing test scripts, running automated tests, and integrating them into CI/CD pipelines. The focus is on using free test automation frameworks and tools for api testing to ensure that anyone can get started without financial barriers.
💡 Key Insights
📌 Free end‑to‑end roadmap for building an API automation framework
📌 Hands‑on setup examples with Postman, Rest Assured, Karate, and Newman
📌 CI/CD integration steps using Jenkins or GitHub Actions
📌 Compact pre‑deployment checklist and best practices for reliability
📌 GraphQL testing guidance plus performance/load testing tips
What Is API Automation Testing?
API Automation Testing is the process of validating that an API (Application Programming Interface) behaves as expected, using automation tools and scripts instead of manually sending requests. APIs serve as the backbone of most web, mobile, and enterprise applications and software development by allowing different software systems to communicate with each other. Ensuring that these APIs function correctly is critical to the performance and reliability of modern applications and web services.
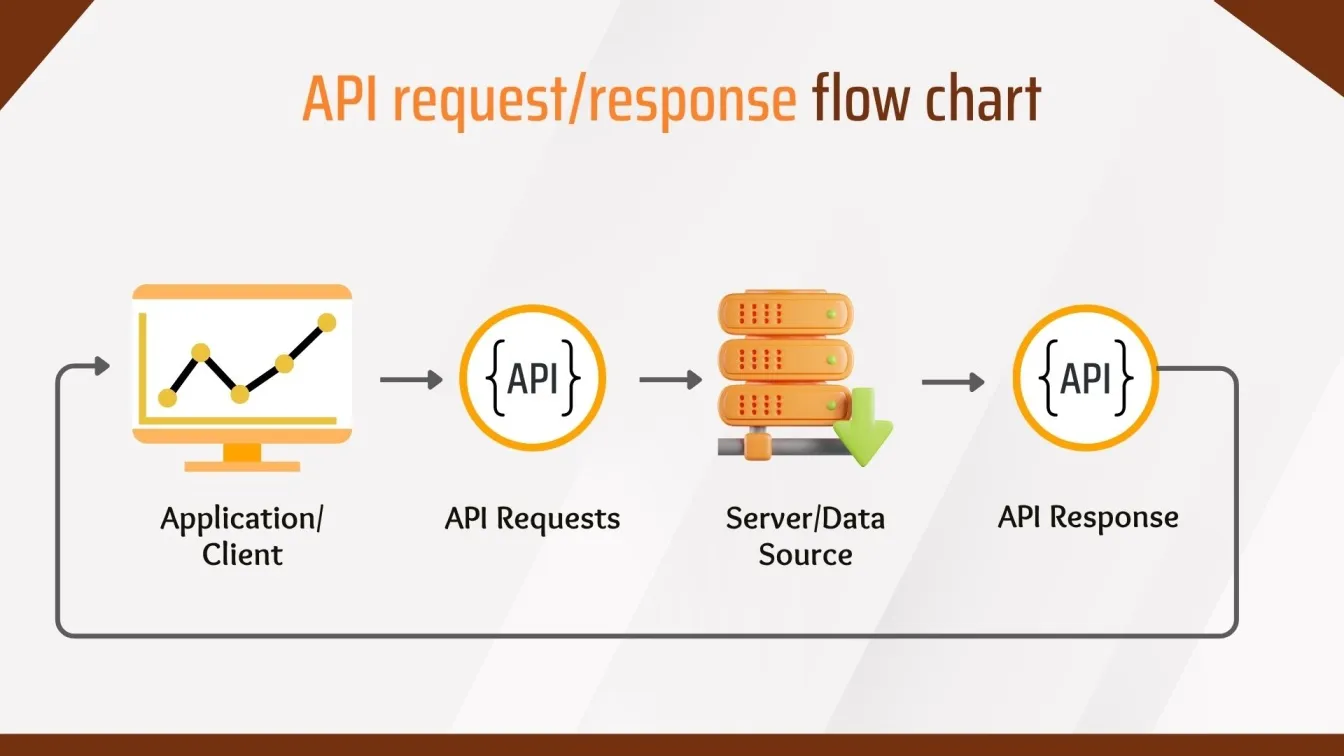
In automated API testing, developers or testers write test scripts with web API testing tools that automatically send requests to API endpoints, validate the responses, check data formats of the API Response, Response Body, and ensure the correct status codes are returned. These scripts can be executed repeatedly, making them ideal for continuous integration (CI) and continuous delivery (CD) environments where frequent code changes occur.
Manual vs. Automated API Testing
Manual API testing involves testers interacting with the API using tools like Postman or curl to send requests and inspect responses. It's useful for ad-hoc, exploratory testing and initial debugging. However, it becomes time-consuming and error-prone for repetitive or large-scale testing. Automated API testing, on the other hand, uses test scripts and frameworks to validate API functionality consistently and efficiently. It's ideal for regression testing, continuous integration, and ensuring long-term reliability as the API evolves. Combining both approaches often gives the best results.

Manual API Testing
Manual API testing involves using API tools such as Postman tool for api testing, cURL, or browser-based plugins to send requests to API endpoints with HTTP methods. Testers manually inspect the responses to verify if the API is returning correct data and behaving as expected.
Example scenario: A tester uses Postman to send a GET request to /api/users and checks if the returned JSON contains the list of users and the correct status code (e.g., 200 OK).
Pros:
- Easy to start and requires no coding.
- Ideal for quick checks or exploratory testing.
Cons:
- Time-consuming when tests need to be repeated often.
- Prone to human error during manual inspection.
- Not scalable for large test suites or regression testing.
Automated API Testing
Automated API testing uses programming or scripting to simulate API requests and automatically validate responses. Frameworks such as Rest Assured (Java), Postman for api testing (with Newman for automation), Cypress, or Python’s Requests + pytest are commonly used to automate these tests.
Example scenario: An automated script sends a POST request to /api/login with credentials, checks if a token is returned, and verifies if the token is valid by calling /api/user-profile.
Pros:
- Fast execution and easy to run repeatedly.
- Suitable for continuous integration pipelines.
Cons:
- Requires initial setup and scripting knowledge.
- It may take time to configure a test suite for complex APIs.
Why Automate API Tests?
Automating API with API test automation tools saves time, ensures consistency, and helps catch bugs early. It’s ideal for frequent regression checks and supports faster development cycles through continuous integration.
Here’s why API Tests are automated,
- Speed and Efficiency: Faster execution of large test suites.
- Repeatability: Ideal for regression testing and CI/CD pipelines.
- Accuracy: Reduces human errors.
- Coverage: Allows for broader test coverage.
- Integration: Easily integrates with other software test automation services.
Understanding the Basics of API Testing
API testing focuses on verifying that endpoints work as expected. It involves sending requests with different methods, checking status codes, headers, authentication, and validating response bodies using assertions to ensure data accuracy and performance.
Key components of API testing include:
- Request methods: GET, POST, PUT, DELETE, etc.
- Status codes: 200 OK, 400 Bad Request, 401 Unauthorized, 521 Web Server Is Down, etc.
- Headers and Authentication: Token-based, API key, Basic Auth.
- Body and Payload: JSON, XML, etc.
- Assertions: Validate status codes, response time, content, etc.
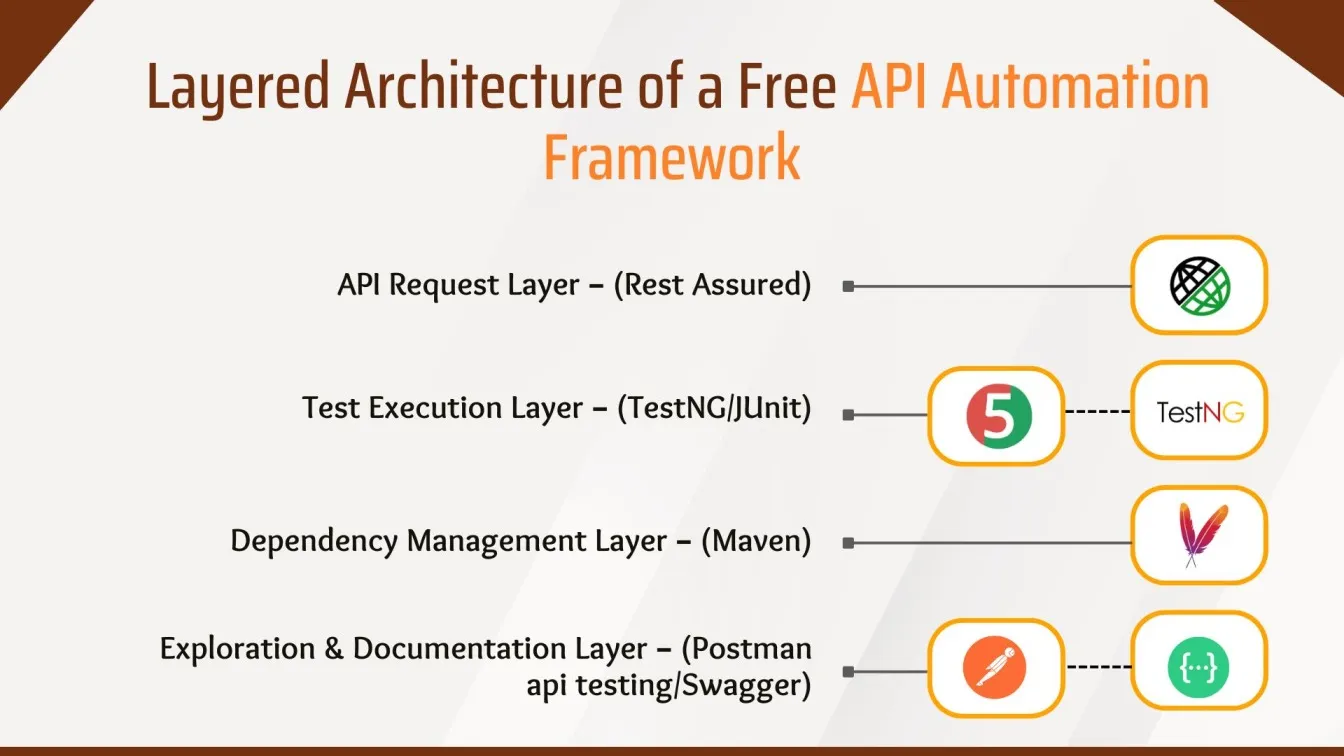
Tools You Need to Build a Free API Automation Framework
To build a robust and cost-effective API automation framework, you'll need tools like Rest Assured for making API requests, TestNG or JUnit for test execution and reporting, Maven for dependency management, and api testing with Postman or Swagger for API exploration and documentation—all free and widely supported by the testing community.
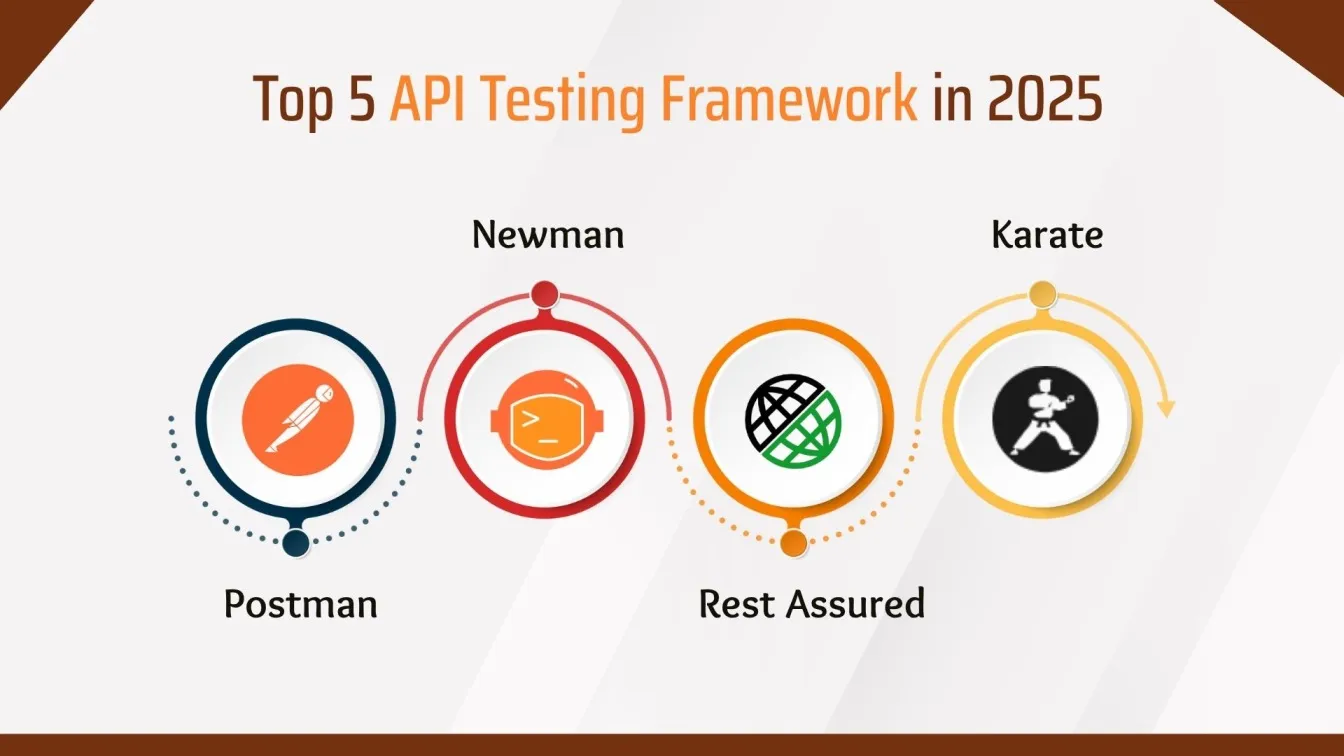
Free API Testing Tools and Libraries
- Postman (API Testing): GUI-based tool for manual and semi-automated API testing
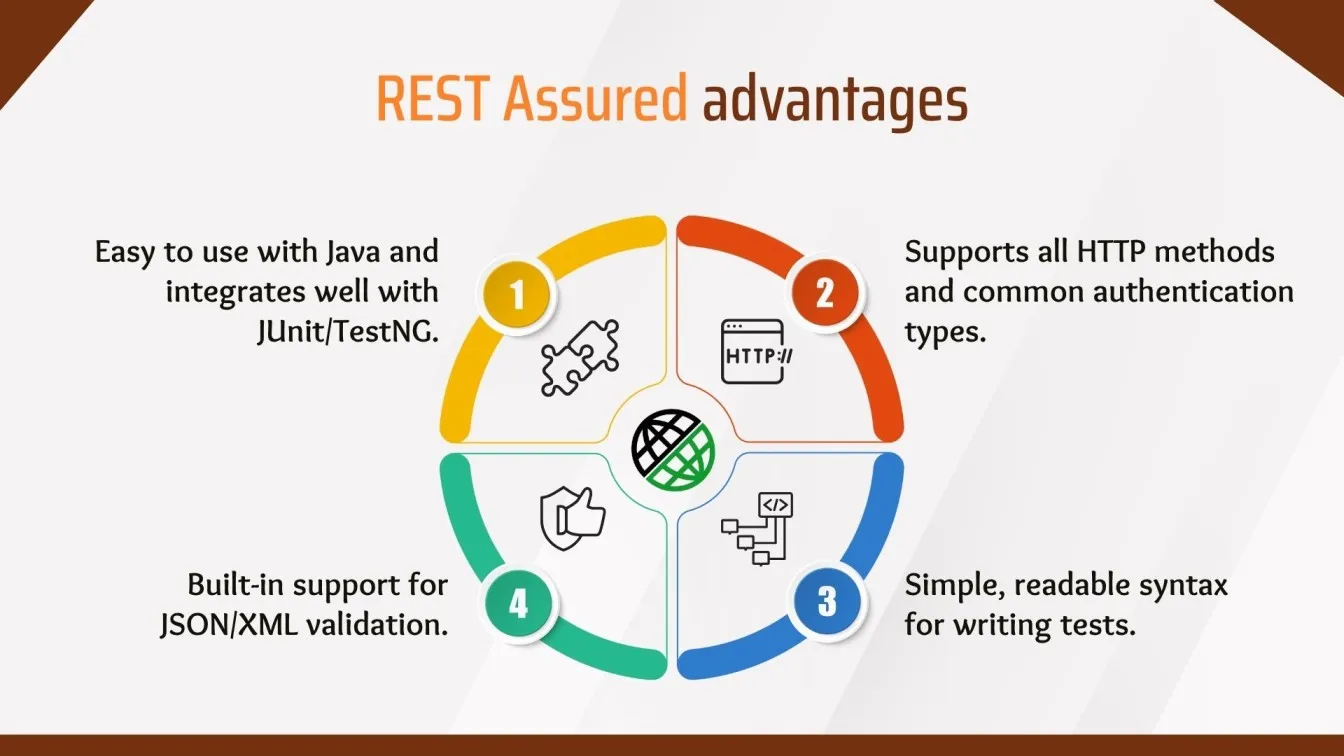
- Rest Assured: Java-based DSL for testing REST APIs
- SoapUI / SoapUI Pro: Functional testing tool for SOAP and REST APIs
- Karate DSL: Combines BDD and API testing in one framework
- JMeter: Open-source load and performance testing tool
- Newman: CLI tool for running Postman collections
- GraphQL Playground: Interactive IDE for writing and testing GraphQL queries
- Apollo GraphQL: Toolset for working with GraphQL APIs
Step-by-Step Setup Guide for an API Automation Framework (Rest Assured with Java)
This section walks you through building a complete API automation framework using Rest Assured with Java. From setting up your project and dependencies to writing your first test case, you’ll learn how to structure, run, and scale your tests efficiently in a real-world environment.
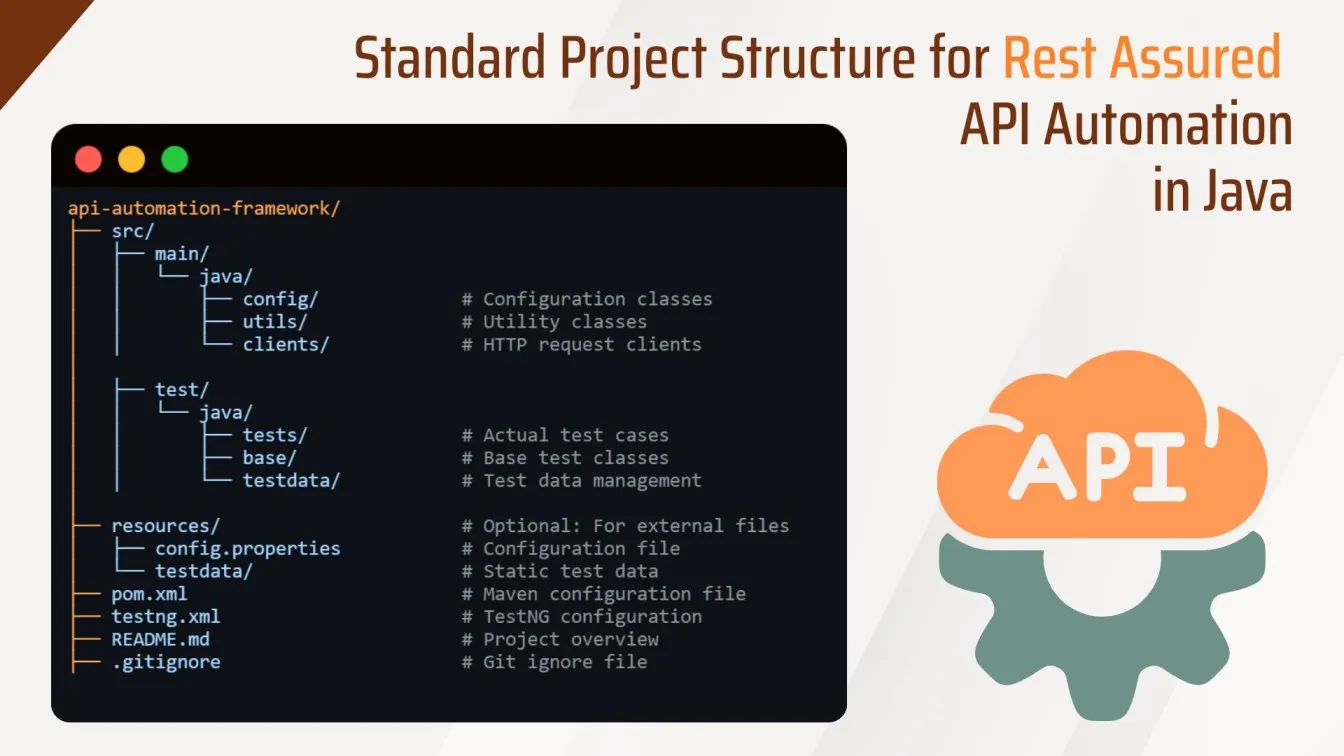
Project Structure and Folder Organization
Organize your project with clear folder separation for test cases, utilities, configurations, and test data. This helps maintain clean code, improves scalability, and makes it easier to manage and debug your Rest Assured tests in Java.
Integrating Testing Libraries and Tools
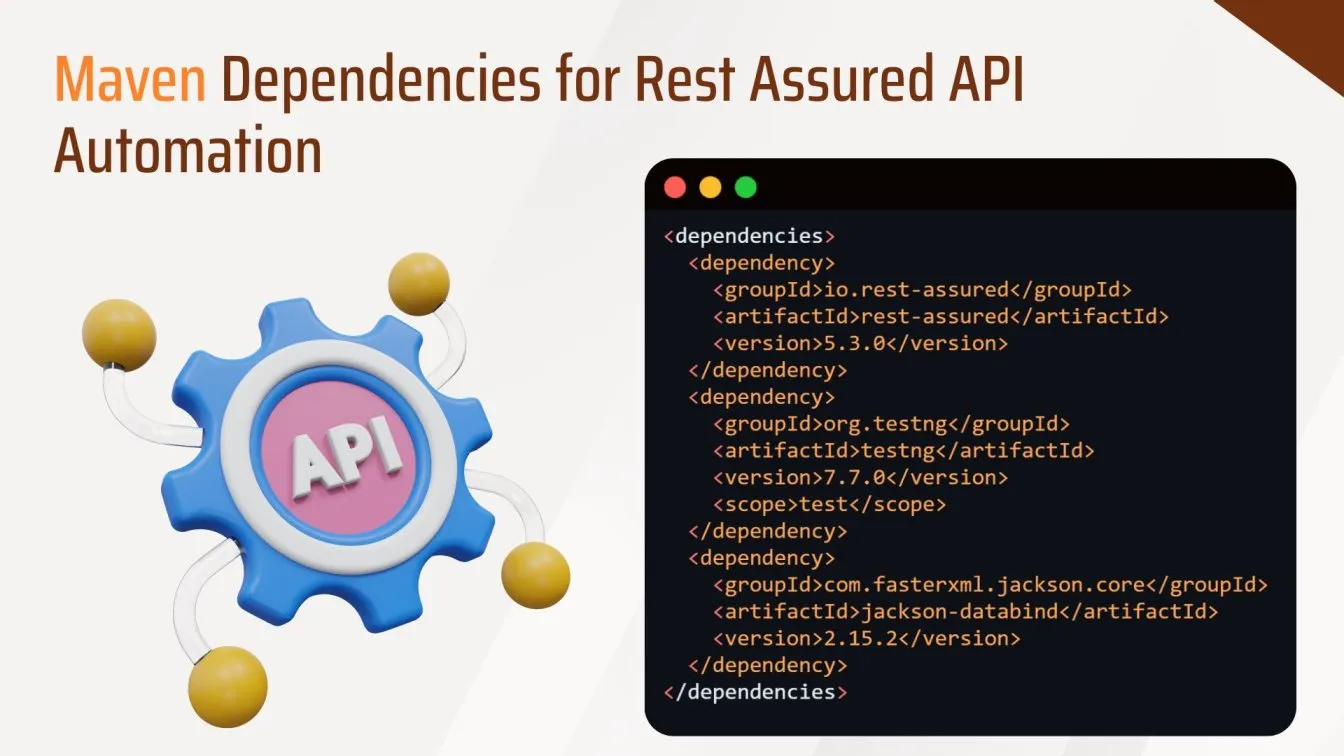
Use Maven to manage project dependencies efficiently. It allows you to easily add and update libraries like Rest Assured, TestNG, and Jackson by declaring them in the pom.xml, ensuring consistent builds and smooth integration of testing tools.
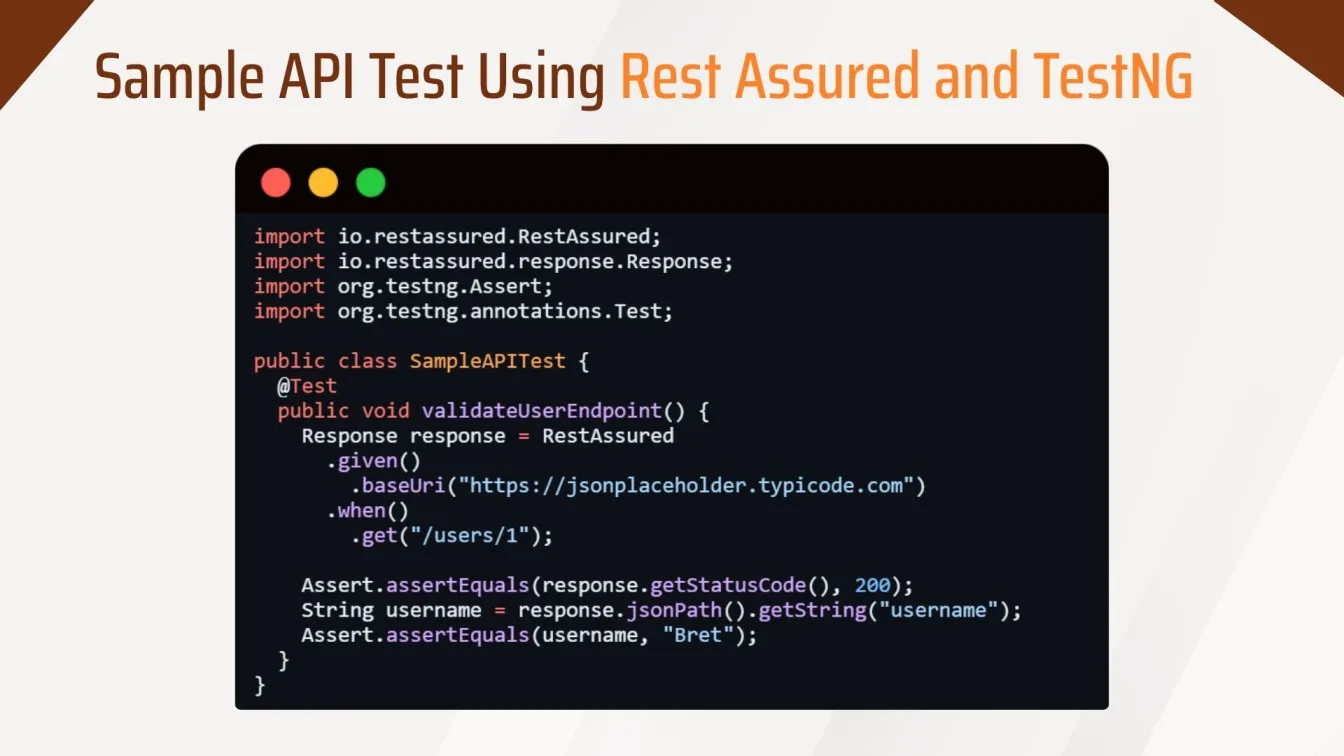
Writing Your First Automated API Test
Start by creating a simple test case using Rest Assured to send a GET or POST request and validate the response. This helps you understand the basic syntax, request structure, and how assertions work in automated API testing with Java.
Running Tests and Viewing Reports
Once your API tests are written, you can execute them using TestNG or Maven with a simple command like mvn clean test. For better visibility into test results, integrate Allure Reports. Allure offers a rich and interactive HTML report that displays test outcomes, execution times, and logs in a structured format.
Use TestNG or Maven command:
mvn clean test
Integrate with Extent Reports or Allure Reports for visual HTML reporting.
API Automation Testing Checklist (Before You Go Live)
Before pushing your APIs to production, it's essential to ensure they are thoroughly tested with respective HTTP methods and ready to handle real-world usage. Here’s a comprehensive checklist to guide you through the final stages of your API automation testing process:
Functional Test Coverage
Functional test coverage ensures your API performs all expected actions correctly. This involves testing each CRUD operation like Create, Read, Update, Delete, to verify that endpoints handle requests as intended.
1. Cover All CRUD Operations (Create, Read, Update, Delete) Ensure that each API endpoint performs the correct operations based on HTTP methods:
- POST for creating resources.
- GET for fetching data.
- PUT or PATCH for updating existing data.
- DELETE for removing records.
Example: For a /users endpoint, test POST /users, GET /users/{id}, PUT /users/{id}, and DELETE /users/{id}.
2. Include Positive and Negative Test Cases
- Positive tests indicate that the API behaves as expected, correctly with valid inputs (e.g., valid user credentials)
- On the other hand, Negative tests indicate that the API handles invalid inputs, such as:
- Missing or malformed parameters.
- Unauthorized access.
- Requests to non-existent resources.
This helps validate error messages, status codes (like 400, 401, 404), and robustness.
3. Validate Response Schema Verify that the structure of the response (JSON/XML) matches the API specification (e.g., OpenAPI/Swagger). Check:
- Field names and types.
- Required and optional properties.
- Nested object structures.
Schema validation ensures clients consuming your API won’t break due to unexpected changes.
4. Test Authentication and Authorization Scenarios APIs often require secured access. Ensure:
- Auth mechanisms like JWT, OAuth, or API keys work as intended.
- Proper access control is enforced (e.g., admin-only routes should reject standard users).
- Expired or invalid tokens are rejected correctly.
Helps prevent unauthorized access or privilege escalation.
Environment and Data Setup
A reliable and isolated test environment is crucial for accurate API testing. Always run tests in stable environments like QA or Staging that closely resemble production. This minimizes unexpected behavior due to configuration changes or unstable data. Clean, consistent environments help avoid false positives/negatives and ensure your test results are trustworthy and repeatable.
1. Ensure Clean Test Environments (QA/Stage) Make sure you're testing in an isolated environment that mirrors production closely. Avoid testing in dev environments with unstable configurations.
2. Create Synthetic Test Data or Use Mocks
- Use test data that doesn’t rely on real users or sensitive information.
- Mocks/stubs can be used for external API calls to avoid side effects or network issues.
Ensures consistent, reliable test outcomes and avoids data leaks.
3. Reset State Between Tests Each test should be independent. Clean up created records after tests run (or use setup/teardown scripts).
- Use database fixtures or transaction rollbacks.
- Avoid flaky tests due to shared data state.
Ensures repeatable test results and avoids data pollution.
CI/CD Integration and Test Execution
Integrating API tests into your CI/CD pipeline ensures they run automatically with every code change. Tools like Jenkins, GitHub Actions, or GitLab CI can trigger tests on events such as pushes, pull requests, or scheduled builds.
1. Integrate with Jenkins, GitHub etc. Automate your API tests by plugging them into your CI/CD pipelines. This ensures tests are:
- Run regularly (on every code push or pull request).
- Helping catch issues early in the development cycle.
2. Trigger API Tests on Pull Requests and Releases Set up automated triggers for:
- Every pull request: to catch regressions before merging.
- Every release/tag build: to verify the app before it reaches production.
3. Generate and Store Test Reports
- Automatically generate reports (HTML, JSON, etc.) after test runs.
- Store them in accessible locations (e.g., S3, build artifacts, dashboards).
- Highlight failed cases, execution time, and coverage.
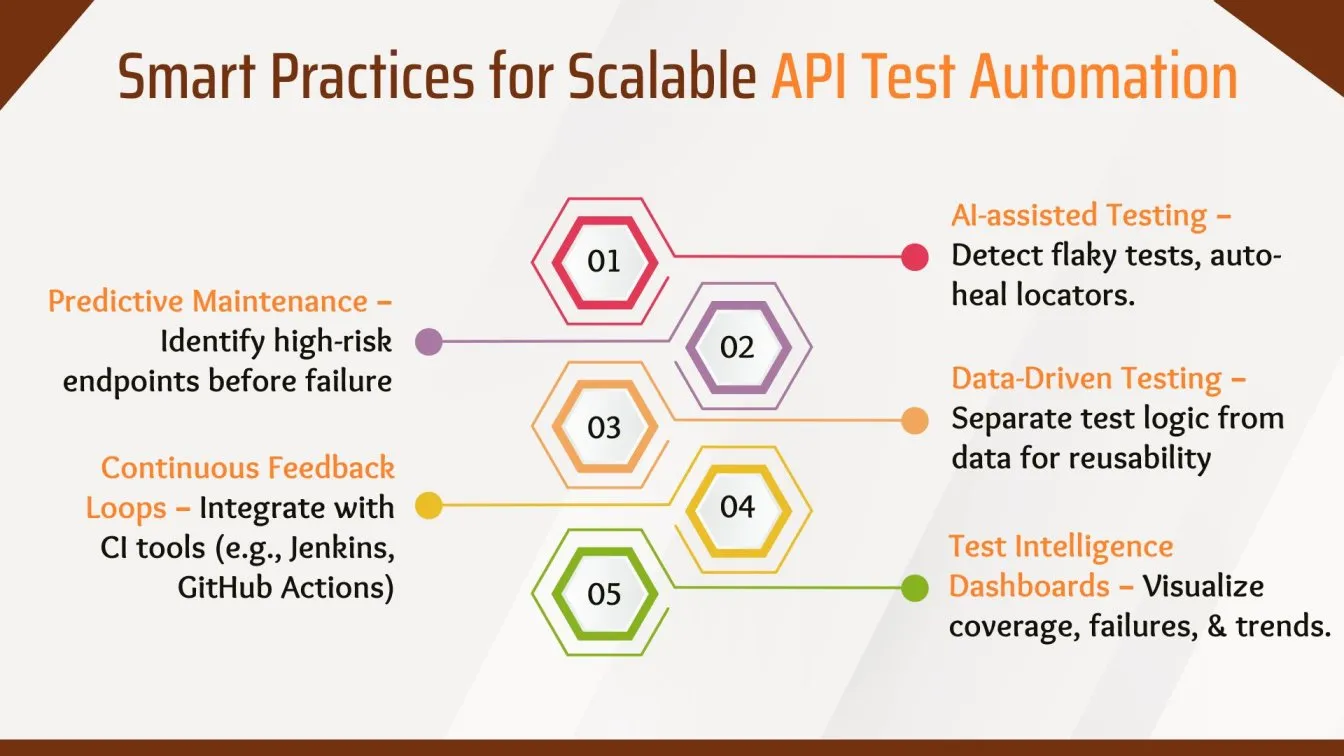
Best Practices for Long-Term API Test Automation Success
To ensure your API test automation strategy remains effective over time, you need to move beyond just writing tests and test reports — and focus on structure, scalability, and maintainability. Here are the best practices followed by experienced QA and DevOps teams:
1. Use BDD: Tools Like Karate or Cucumber for Readability
Behavior-Driven Development (BDD) promotes writing tests in a natural, language-like syntax (e.g., Gherkin). This bridges the gap between technical and non-technical stakeholders.
- Karate: A popular framework that combines API testing and BDD in one.
- Cucumber: Lets you define test behavior in a Given-When-Then format.
Benefits:
- Improves readability for QA, developers, and business teams.
- Encourages collaborative test case design.
- Easier onboarding for new team members.
2. Keep Tests Isolated: Avoid Dependencies
Tests should not rely on the outcomes of other tests or shared state/data. Each test must:
- Create its own test data (or mock it).
- Clean up after itself.
- Be executable independently in any order.
Why it matters:
- Prevents flaky tests.
- Improves test reliability and debugging.
- Enables parallel test execution.
Use mocking, stubbing, or unique data generation to maintain independence.
3. Version Control: Use Git for Code and Test Scripts
API test scripts are code — treat them like any other part of your software project.
Best Practices:
- Store test scripts in the same repository as your application (or a related repo).
- Use branches, pull requests, and code reviews for test updates.
- Link test versions to API versions.
Benefits:
- Enables collaboration and traceability.
- Simplifies rollback and debugging.
- Makes CI/CD integration seamless.
4. Monitor Performance: Use Load Testing Tools Like JMeter
Functionality isn’t enough — on your web services, your API should also perform well under load. Use tools like:
- Apache JMeter for load, stress, and performance testing.
- k6, Gatling, or Locust for modern, scriptable performance tests.
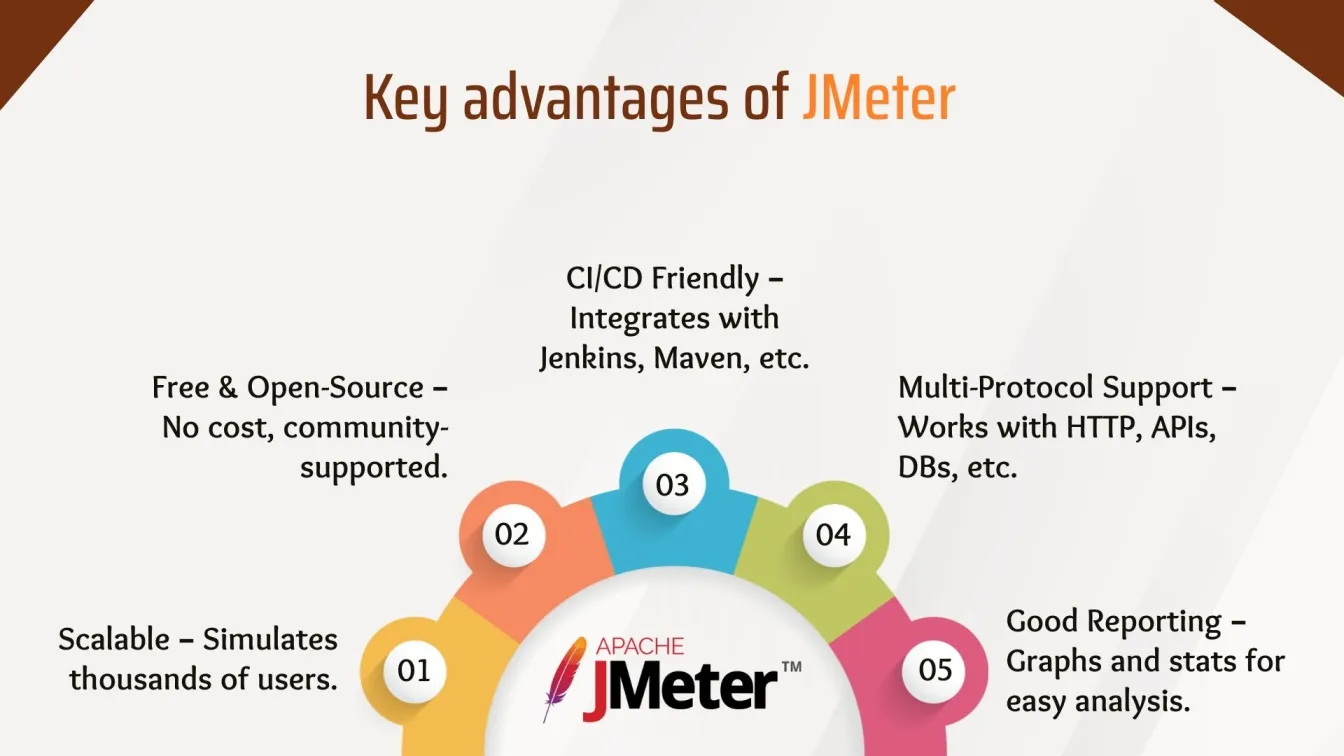
Why it matters:
- Helps identify bottlenecks (slow database calls, unoptimized endpoints).
- Validates API behavior under stress or concurrent users.
- Prevents crashes and latency issues in production.
Integrate performance tests into your CI/CD for continuous feedback.
5. Use GraphQL-Specific Tools (If Applicable)
What is GraphQL?
GraphQL is a modern alternative to traditional REST APIs, designed by Facebook to make data fetching more efficient and flexible. Unlike REST, where fixed endpoints return predefined data, GraphQL allows clients to request exactly the fields they need from a single endpoint. This reduces overfetching and improves performance.
If your APIs are built with GraphQL, they need different testing strategies from REST APIs.
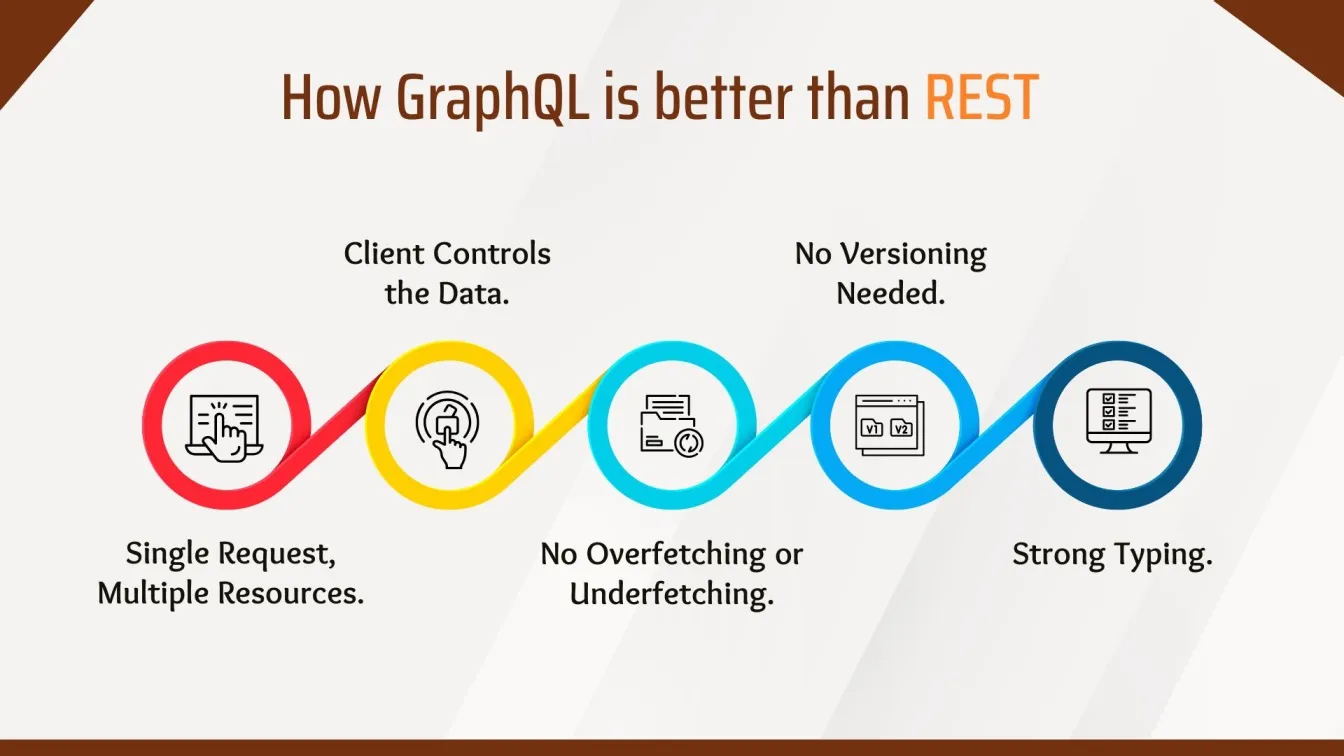
Recommended Tools:
- Apollo GraphQL: Offers mocking, testing utilities, and schema validation.
- Postman api testing (GraphQL tab): Supports testing GraphQL queries and mutations.
- GraphQL Voyager or Insomnia: Helpful for introspection and exploring the schema.
the
Why it's different:
- GraphQL uses a single endpoint with varying queries.
- Testing should focus on query structure, variable validation, and resolver performance.
Write both schema validation tests and business logic tests for each resolver.
6. Centralized Logging: Helps in Debugging
When a test fails, logs are your first source of truth. Use centralized logging to:
- Aggregate logs from tests, applications, and test runners.
- Correlate failed test cases with backend error logs.
- Store logs in tools like ELK Stack, Grafana Loki, or CloudWatch.
Benefits:
- Reduces time-to-debug significantly.
- Helps uncover backend issues triggered during testing.
- Makes test audits and postmortems easier.
7. Regular Review: Clean Redundant or Outdated Tests
Over time, tests can:
- Target deprecated endpoints.
- Duplicate existing scenarios.
- Contain hardcoded or outdated test data.
Set up test reviews as part of sprint grooming or release cycles.
Review Focus Areas:
- Remove tests for removed features.
- Consolidate overlapping test cases.
- Update test data and assertions as business logic changes.
Result:
- Keep your test suite lean and meaningful.
- Speeds up execution, improves maintainability, and helps improve response time.
- Enhances web services experience.
Final Thoughts
This step-by-step guide helps you build a complete API automation testing framework using only free tools. Whether you're new or experienced, you'll learn how to choose the right API test automation tools, structure your project, write reliable test cases, and integrate them into CI/CD pipelines. It covers both manual and automated testing using popular tools such as Postman for API testing, Rest Assured, Karate, and even GraphQL testing.
From testing CRUD operations and validating response schemas to handling authentication, load testing API tools, and writing scalable test scripts, this guide ensures you gain hands-on experience with widely used web API testing tools. You'll also explore how tools like Postman API, Newman, and JMeter support REST and GraphQL APIs.
Packed with best practices, project setup tips, and even API automation interview questions, this guide is a go-to resource for mastering Postman automation, understanding what GraphQL is, exploring API Postman, and leveraging top REST API testing tools.
FAQs
👉 What is the difference between given and when in REST-Assured?
In REST-Assured, given() is used to set up the request (like headers, params, body), while when() is used to trigger the request method, such as GET or POST.
👉 What does a 521 status code mean?
521 indicates that the web server is down. It's commonly seen with services like Cloudflare.
👉 What is a SOAP API used for?
SOAP (Simple Object Access Protocol) is used for enterprise-level web services, especially where strong security and ACID compliance are required.
👉 How to use Postman for API performance testing?
To perform API performance testing with Postman, use the Collection Runner or Newman with multiple iterations. For deeper load testing and response time analysis, consider integrating with JMeter or using Postman-to-JMeter plugins.
👉 Is SOAP better than REST API?
SOAP is suited for complex, secure, and stateful operations, while REST is preferred for web and mobile apps due to its simplicity, speed, and lightweight nature.